Start from a tournament that is ready for registration
This guide starts after the basic tournament has already been created. If the event is not built yet, start with How to Create a Tournament in BracketIQ, then return here when the tournament is published or close to publish-ready.
The example uses a one-day indoor soccer tournament with team registration, but the same registration workflow applies to volleyball, pickleball, basketball, tennis, hockey, baseball, football, outdoor soccer, and other recreational sports.
Before you open registration, decide:
- How captains should register teams, and whether players without a team should have a free-agent path.
- How many teams can join.
- Which division teams should choose.
- Whether teams pay online.
- How long before the start time registration should close.
- Whether teams need required documents before playing.
- How you will handle late teams, free agents, and waitlist interest.
BracketIQ connects those decisions to the public event page, team signup controls, payment flow, and organizer participant list.
Confirm the tournament registration settings
Open the tournament dashboard and go to the Details tab. In Event Details, confirm that the event is a tournament and that team registration is enabled.
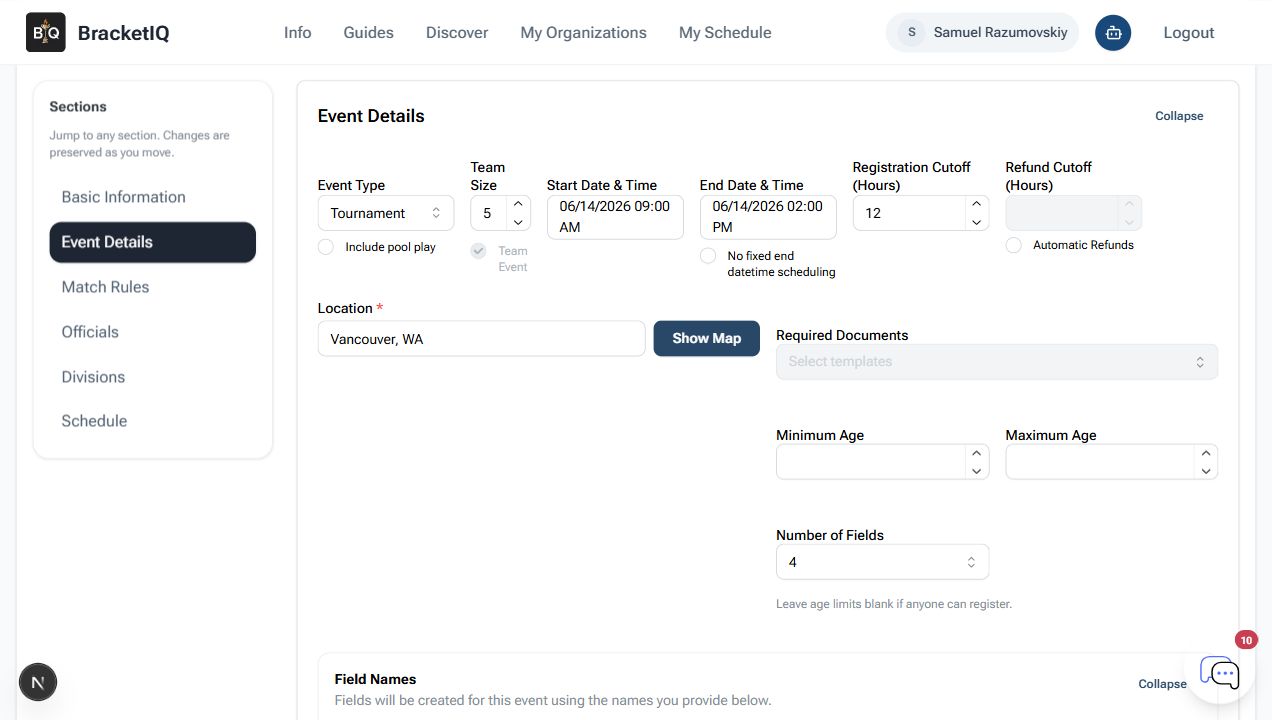
For this example, the important settings are:
- Event Type:
Tournament - Team Size:
5 - Team Event: enabled
- Registration cutoff:
12hours before the start - Location:
Vancouver, WA - Required Documents: empty for this event
- Number of fields:
4
Team size matters because it helps captains understand the roster expectation. The registration cutoff matters because it gives you time to review teams, payments, documents, and schedule changes before the first match.
If you require waivers or other documents, add them before you send the registration link. That keeps the player and captain workflow clear instead of asking teams to complete paperwork later in a separate process.
Set the division capacity and price
Open Divisions after the event-level settings look right. A tournament can have one division or several divisions, but every registration needs somewhere to land.
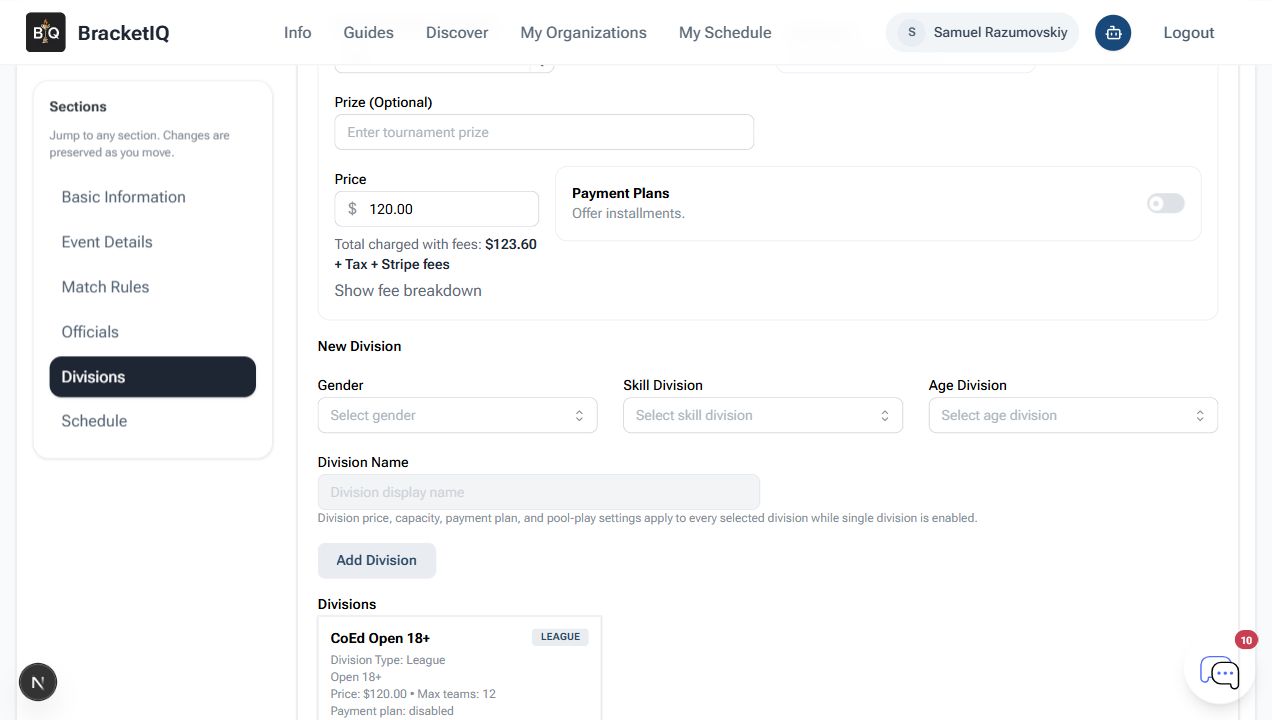
For the indoor soccer example:
- Division:
CoEd Open 18+ - Price:
$120.00 - Max teams:
12 - Payment plan: disabled
- Division card: saved and visible below the form
Set the price and capacity before players register. If you change those fields after captains have already joined, you may need to explain the change, send bills manually, or clean up teams that joined under the old setup.
For paid events, the public page shows the team entry price and BracketIQ can route the captain toward checkout after a team is selected. If you need a payment-focused walkthrough, the paid pickup event guide shows how BracketIQ presents fees and online payment flow.
Review the public registration page
After the registration settings are saved, open the public event page. This is the page teams see before they choose a division or register.
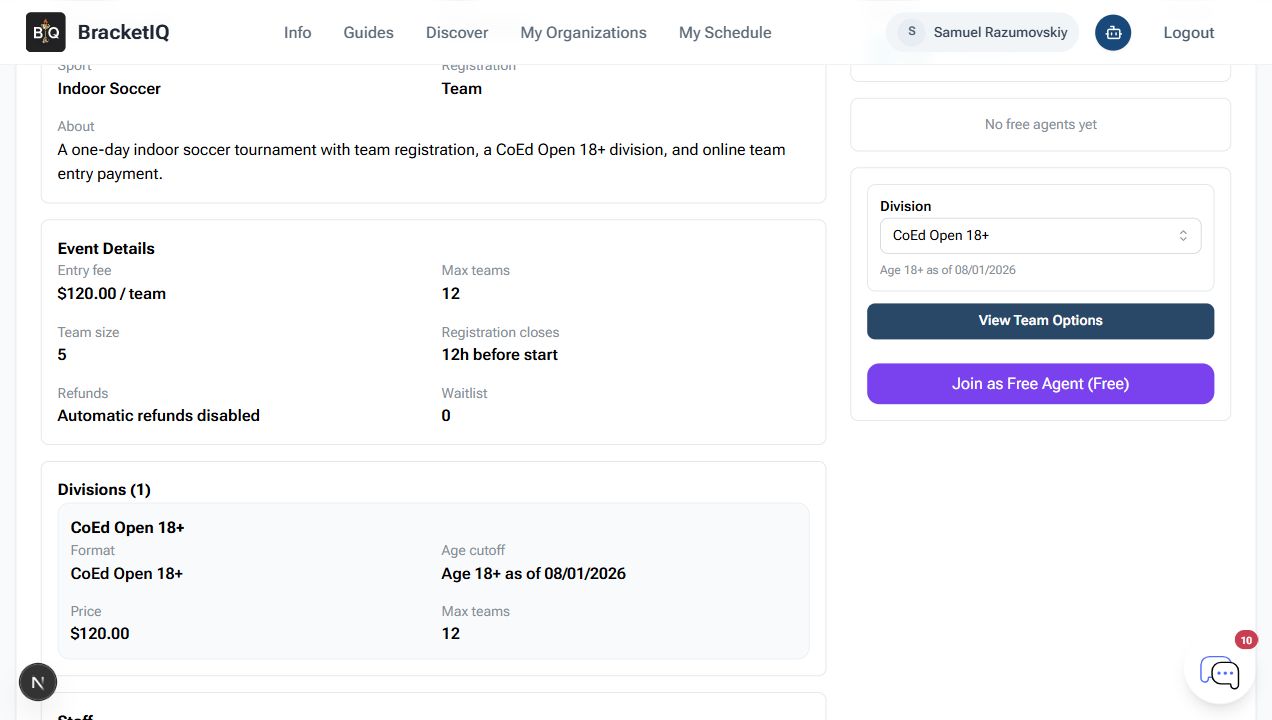
Check the player-facing details:
- Entry fee is
$120.00 / team. - Max teams is
12. - Team size is
5. - Registration closes
12h before start. - The visible division is
CoEd Open 18+. - The
View Team Optionsbutton is available.
This step catches most registration mistakes. If the public page says the wrong price, capacity, team size, or division, captains will register based on bad information.
Show captains the team path
Click View Team Options to confirm the captain flow. Captains should be able to select a team they manage or go to Manage Teams if they need to create or clean up a team first.
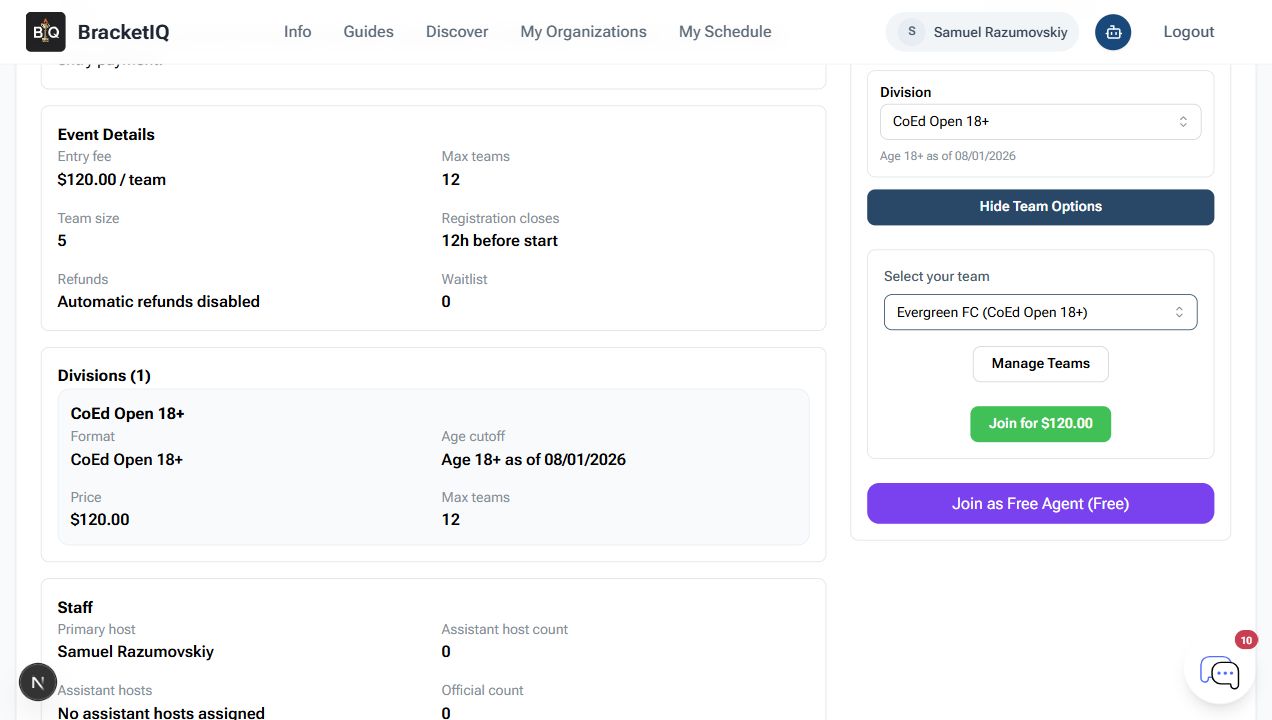
In this example, the captain selects Evergreen FC (CoEd Open 18+), and the join button changes to Join for $120.00.
Use this check to confirm:
- Captains can find the correct team.
- The team division matches the tournament division.
- The paid join button shows the expected amount.
- The free-agent option is present when you want players to express interest without a full team.
- The Manage Teams button gives captains a path to update or create a team before registering.
Do not assume captains know whether they should create a team first. If you are sharing the event link publicly, include a short note such as: "Captains should select or create their team before completing registration."
Monitor teams after registration opens
Once teams are registering, use the organizer Participants tab to review the actual team list.
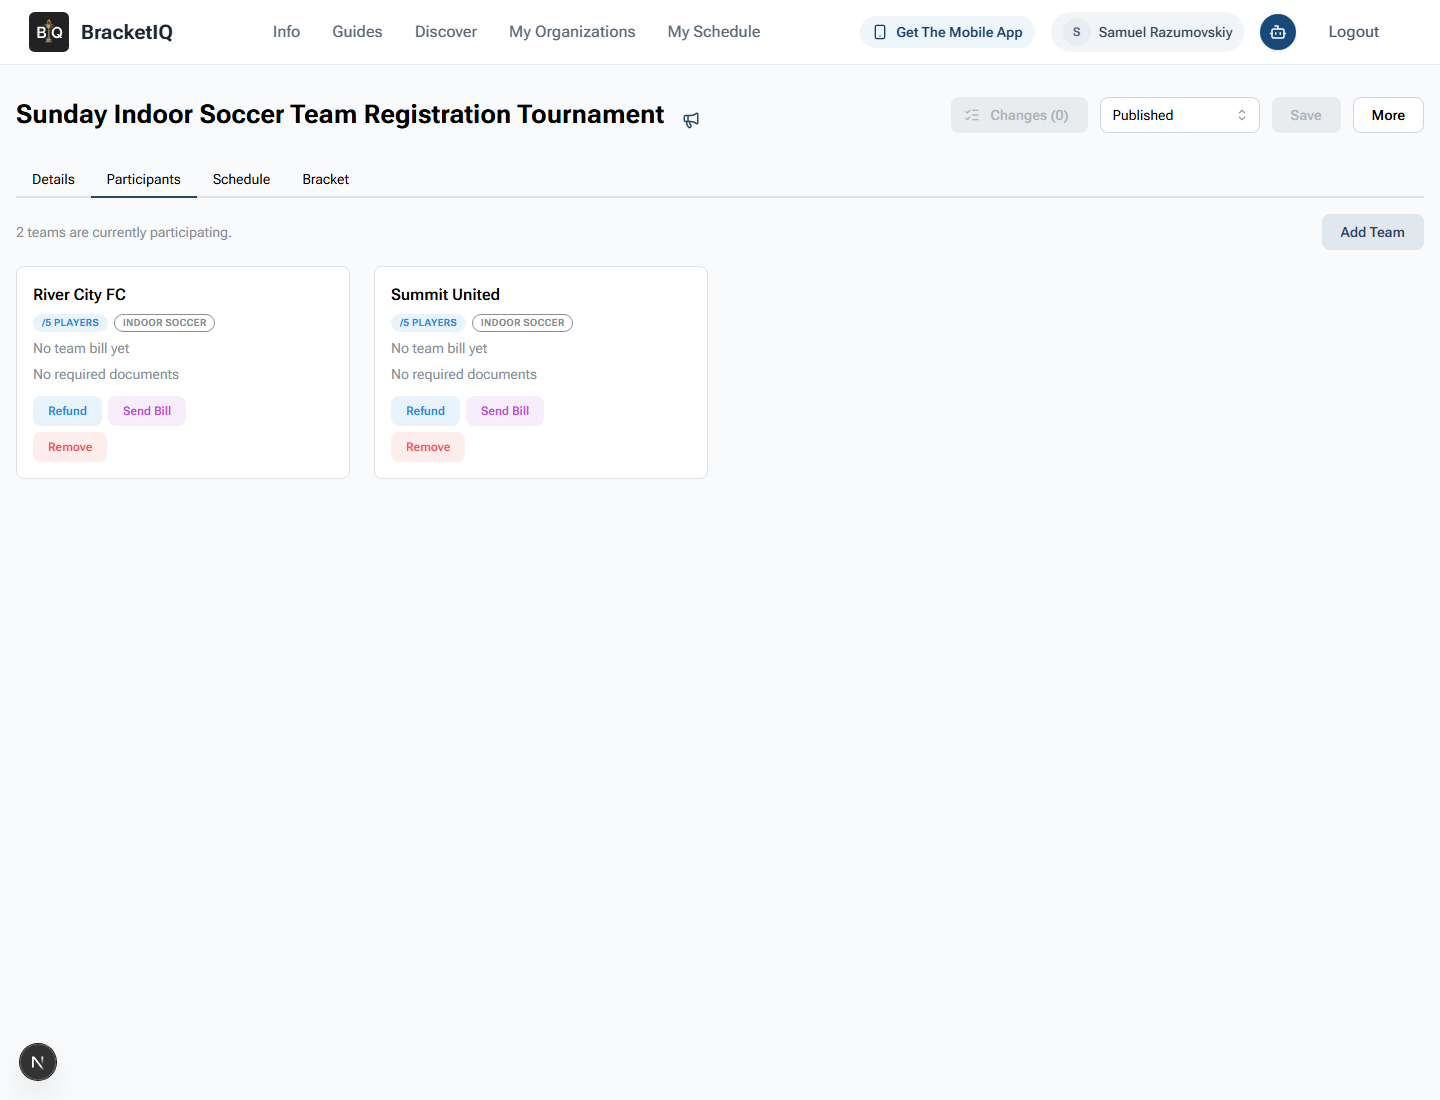
In this example, the organizer can see:
2 teams are currently participating.River City FCSummit United- No team bill yet
- No required documents
- Refund, Send Bill, Remove, and Add Team controls
Use this screen before you finalize the schedule. You should know which teams are active, which teams still need payment follow-up, and whether any required documents are missing.
Manual Add Team is useful for organizer-entered teams, late additions, or teams that paid outside the normal checkout flow. Use Remove carefully because removing a team can affect capacity, scheduling, bills, and participant expectations.
Tournament registration checklist
Use this checklist before sharing the registration link:
- Confirm Event Type is
Tournament. - Confirm team registration is enabled.
- Set team size.
- Set the registration cutoff.
- Add required documents if teams must complete them.
- Add at least one division.
- Set capacity for each division.
- Set the team price before publishing.
- Open the public page and verify the player-facing details.
- Test
View Team Options. - Confirm the paid join amount.
- Review the Participants tab after teams start joining.
- Follow up on teams with missing bills, documents, or roster information.
Tournament registration is the bridge between event setup and tournament day. BracketIQ keeps the registration page, team selection, payment path, and organizer participant list connected so you can move from signups into tournament management without rebuilding the event in another tool. If your format uses pools before bracket play, continue with How to Run a Tournament With Pool Play after the team list is ready.
